This tutorial shows the user how to use the Ableton Live DRUM BUSS audio effect.
Need a Pro Audio laptop to run Ableton Live software and all of its features at its best? Check out the MC Mobile line of Pro Audio Laptops from PCAudioLabs.
On the modern days of audio mixing, the digital tools that engineers use in order to shape the recorded sound are called Plugins. Plugins can emulate the behavior of vintage analog pieces of gear, or simply act as clean/linear digital signal processors, performing tasks such as equalization, compression, limiting, expansion, gating, time-domain effects, etc. Ableton Live comes with a variety of proprietary plugins (effects) that can help the user mix a music production completely “in-the-box”.
One of the most used inserts that come with Ableton Live is the DRUM BUSS, which can be defined as a device that works as a drum processor adding body and character to the instrument in order to make it more suitable for the mix by using drive and compression controls.
For the purpose of this tutorial, we will explain how to use the Drum Buss audio effect in Ableton Live 10:
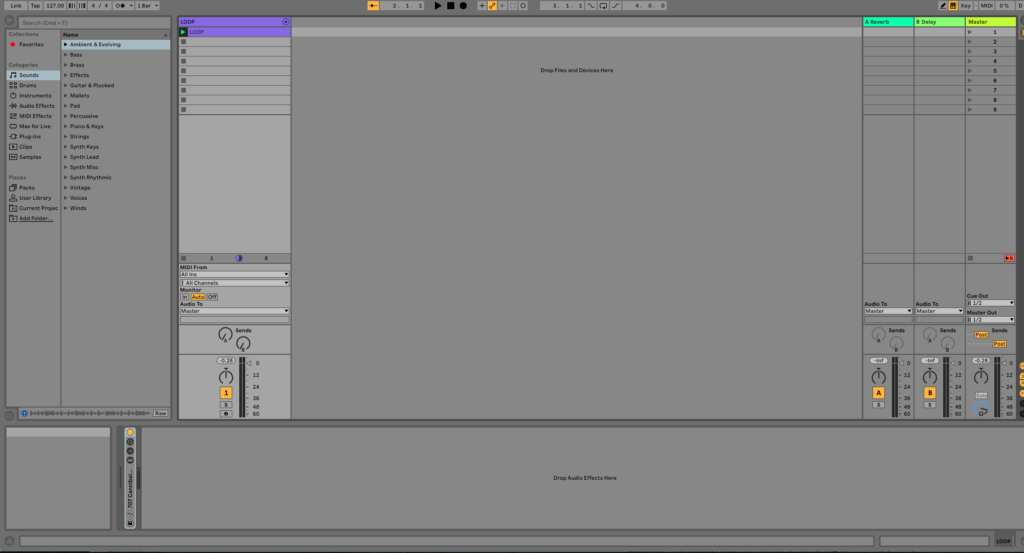
- Create a Live Set with at least one audio track. Make sure the audio track has at least one audio clip assigned to it.
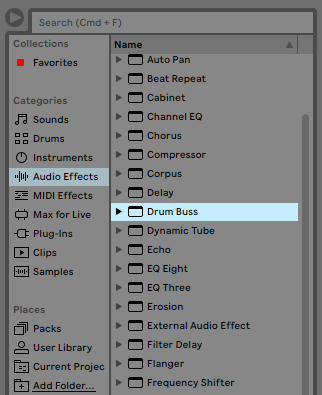
2. From the Browser, search for Audio Effects -> Drum Buss:
3. Drag and Drop the Drum Buss audio effect on top of the audio track labeled as “Loop”.
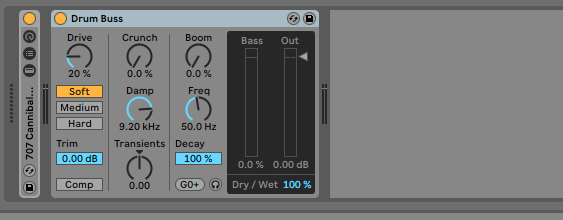
As soon as this effect has been dropped on top of the track, it is easy to see how the Drum Buss audio effect now appears on the device view of the track.
It is easy to see from the previous picture, the Drum Buss audio effect has several parameters that can be explained as:
- Drive: This knob controls the amount of drive applied to the incoming signal.
- Soft mode: This distortion mode is based on waveshaping distortion.
- Medium mode: This distortion mode is based on limiting distortion.
- Hard mode: This distortion mode is based on clipping distortion with bass boost.
- Trim: This slider lets the user attenuate the incoming signal.
- Comp: When this button is engaged, a fixed compressor will be applied to the input signal before it hits the distortion stage. The compressor will have fast attack, medium release and moderate ratio settings, optimized for drum or percussion groups.
- Crunch: This knob adds extra distortion to the mid-high frequencies.
- Damp: This knob adds a low-pass filter to remove unwanted high frequencies coming from the added distortion.
- Transients: This knob emphasizes or de-emphasized transients above 100 Hz.
- Boom: This knob adjusts the amount of low-end enhancement that the resonant filter produces.
- Freq: This knob adjusts the frequency of the low-end enhancer.
- Decay: This knob adjusts the decay rate of the low frequencies.
- Force To Note: This button sets low-end enhancer’s frequency to the value of the nearest MIDI note.
- Boom Audition: This button lets the user only hear the results of the low-frequency enhancer.
- Bass Meter: This meter show the activity of the low frequency output.
- Output: This slider sets the amount of gain applied to the output signal.
- Dry/Wet: This adjusts the balance between the processed and unprocessed signals.
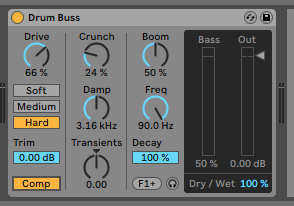
For the purpose of this tutorial, we will use the Drum Buss to compress the incoming signal as well as driving it in Hard mode. Also, low end enhancement will be applied at 50%. The Drum Buss audio effect should be set as:
- Drive: 66%.
- Soft mode: N/A.
- Medium mode: N/A.
- Hard mode: ON.
- Trim: 0 dB.
- Comp: ON.
- Crunch: 24%.
- Damp: 3.16 KHz.
- Transients: 0.
- Boom: 50%.
- Freq: 90%.
- Decay: 100%.
- Force To Note: N/A.
- Boom Audition: ODD.
- Bass Meter: N/A.
- Output: 0 dB.
- Dry/Wet: 100%.
4. Apply the previous configuration, and the Drum Buss audio effect should look like this:
At this point we have successfully explained how to use and configure the Drum Buss audio effect in Ableton Live 10. The tutorial has now finished.
Using Ableton Live 10 software to produce music would be ideal with one of our professionally designed PCAudioLabs Systems due our high-performance specifications in order to work with any of the Digital Audio Workstations supported. If you would like to order one of our PCAudioLabs computers, please call us at 615-933-6775 or click this link for our website.


