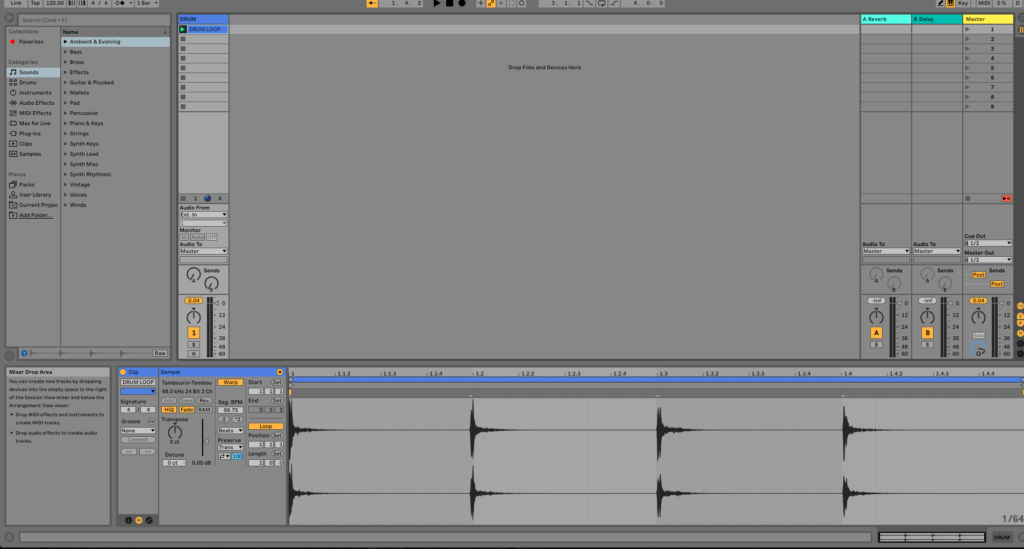
This tutorial shows the user How to Warp Audio in Ableton Live.
This is part 2 of a series.
Need a Pro Audio laptop to run Ableton Live software and all of its features at its best? Check out the MC Mobile line of Pro Audio Laptops from PCAudioLabs.
“Warping” is one of the most important functions included in Ableton Live that lets the user time-stretch audio clips. There are several parameters and modes that can be selected in order to time-stretch an audio clip for a specific aesthetic purpose.
Warping can also be defined as Live’s ability to play any sample in sync with your defined tempo. This means that the original tempo of the sample can be changed in order to match the tempo of the Live Set, obtaining interesting aesthetic effects.
This time-stretching of audio information is typically used to edit or modify recorded performances and can happen without affecting the pitch of the original audio clip, which is the beauty of this method.
On this tutorial we will explain the user how to apply basic audio clip warping in Live:
- Open or create a new Live Set with at least one audio track included that contains an audio clip:
For the purpose of this tutorial, the audio clip included is a basic drum pattern.
2. Locate at the detail view of the audio clip from the track:
3. Make sure “Warp” is ON. It should be highlighted in yellow.
If it is OFF, it will be greyed out and this can simply be toggled to ON by clicking on “Warp”.
As soon as “WARP” has been set to ON, this clip has been warped. The user can now modify the tempo of the Live Set and the audio clip will playback accordingly without changing its original pitch.
4. Look now for the inverted grey triangles that appear above the grid of the audio clip.
These inverted grey triangles are called “Transient Markers”. They basically tell the program where a transient is located after the clip was warped.
5. Double-click on each Transient Marker to turn them into “Warp Markers”:
With the Warp Markers set, the user can treat the audio as if it was a “rubber band” and each Warp Marker is an anchor point. This allows the user to click and drag the warp marker, in order to time stretch the clip, easily manipulating the audio.
This method can be used in order to correct performances, change the timing of a clip, or in an aesthetic way in order to completely transform the original performance.
Alternatively, the user can click anywhere within the audio clip in order to create a new Warp Marker at the location.
6. Click and drag any of the recently created yellow Warp Markers in order to modify the clip:
Note that in this case, Live was able to easily evaluate the audio clip and warp it. The process of finding the transients was very simple. The reason this happens is because of the Warp Mode that was selected, which is special for transient-based material. In this case the mode was set to “Beats”.
7. Locate the Warp Mode drop-down list:
It can be seen that the Warp Mode selected was “Beats”. This mode is specially useful for transient-based material such as percussion, drums, etc. However, the user can select different algorithms depending on the program material being warped.
The different Warp Modes can be explained as:
- Beats Mode: designed for rhythmic-based material such as drums and percussion.
- Tones Mode: designed for clearly-pitched audio material such as vocals, monophonic instruments and bass lines.
- Texture Mode: designed for polyphonic or noisy sounds such as polyphonic orchestral music, pads, noise.
- Repitch: designed for stretching while adjusting the pitch, as a vinyl record would do when it has been speed up or slowed down.
- Complex and Complex Pro: both of these modes are designed to analyze entire songs using all the previous algorithms.
On following tutorials we will explain how to use each of these warp modes in detail.
At this point we have successfully explained the user how to warp audio clips in Love. The tutorial has now finished.
Using Ableton Live 10 software to produce music would be ideal with one of our professionally designed PCAudioLabs Systems due our high-performance specifications in order to work with any of the Digital Audio Workstations supported. If you would like to order one of our PCAudioLabs computers, please call us at 615-933-6775 or click this link for our website.


