Status Line in Cubase
This blog will discuss the Status Line in Cubase.
Want to learn how to use Steinberg Cubase in real time, with a professional digital audio trainer? It’s faster than blogs, videos, or tutorials. Call OBEDIA for one on one training for Steinberg Cubase and all digital audio hardware and software. visit our website to get started.
Need a Pro Audio laptop or Desktop PC to run Steinberg Cubase software and all of its features at its best?
Check out our pro audio PCs at PCAudioLabs.
Want the video? Click below to watch our video about the Status Line in Cubase:
Status Line in Cubase
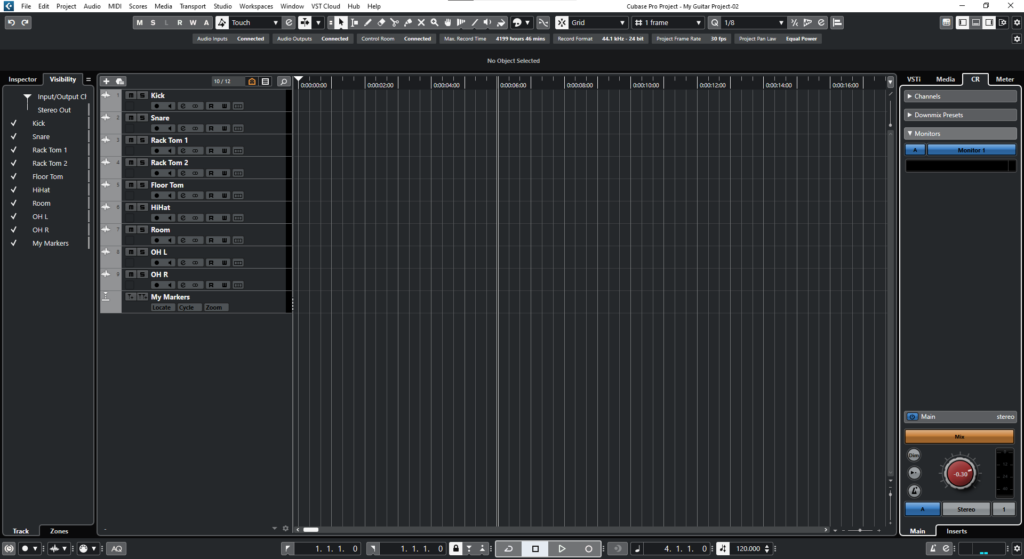
The Status Line is another “horizontal bar” that will show you some crucial information regarding your Cubase project.
Sometimes we try to operate the software and we can’t seem to get audio happening, or the recording suddenly stops… Chances are, these problems could have been noticed at the Status Line from the second we created the project.
Let’s go ahead and dive deep into this Status Line.
Here we go!
-
Open your Cubase project:
2. Look for the horizontal line located above the timeline:
And here is the Status Line. This bar shows the most important project settings, such as:
- Audio Inputs/Outputs: When this fields show “Connected” it means that the inputs and outputs have been assigned. If you skip the I/O assignment, it will show “Not Connected”.
- Control Room: When this fields show “Connected” it means that the control room has been assigned. If you skip the CR assignment, it will show “Not Connected”.
- Max Record Time: This field will show how much available recording time you have in your hard drive. Depending on which hard drive you have selected for the Cubase project, the available time can be more or less. Time is expressed in hours and minutes.
- Record Format: This field shows the sample rate and bit depth resolution assigned to the recorded audio on the project.
- Project Frame Rate: This field shows the frame rate assigned to the video track of the project.
- Project Pan Law: This field shows the pan law assigned to the panning pots on the project’s mixer.
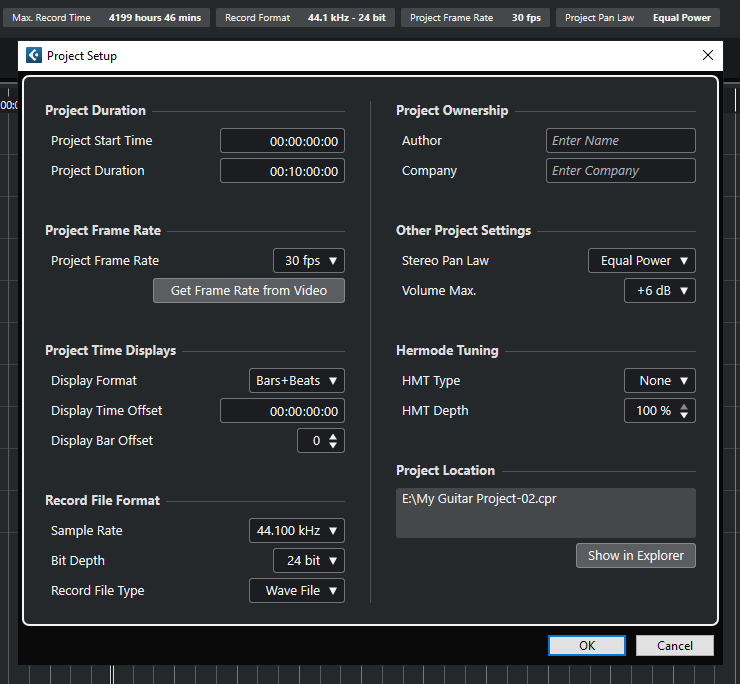
If is important to know, you can simply click on any of these fields on the Status Line, and the associated configuration window will open! So it is easy to re-configure these parameters when needed.
3. Click on the “Record Format” field:
It is easy to see how once we clicked on the “Record Format” field, the Project Setup window opened so we can now modify any of those parameters if needed.
And that is it!
You have now learned how to navigate on the Status Line in Cubase.
We hope you found this tutorial on how to use the Status Line in Cubase helpful!
Using Steinberg Cubase software to produce music would be ideal with one of our professionally designed PCAudioLabs Systems due our high-performance specifications in order to work with any of the Digital Audio Workstations supported. If you would like to order one of our PCAudioLabs computers, please call us at 615-933-6775 or click this link for our website.


