This tutorial shows the user how to use the Ableton Live MULTIBAND DYNAMICS audio effect.
Need a Pro Audio laptop to run Ableton Live software and all of its features at its best? Check out the MC Mobile line of Pro Audio Laptops from PCAudioLabs.
On the modern days of audio mixing, the digital tools that engineers use in order to shape the recorded sound are called Plugins. Plugins can emulate the behavior of vintage analog pieces of gear, or simply act as clean/linear digital signal processors, performing tasks such as equalization, compression, limiting, expansion, gating, time-domain effects, etc. Ableton Live comes with a variety of proprietary plugins (effects) that can help the user mix a music production completely “in-the-box”.
One of the most used inserts that come with Ableton Live is the Multiband Dynamics, which can be defined as a device represents a flexible tool for modifying the dynamic range of audio material, primarily as a mastering processor. It allows for upward and downward compression and expansion of up to three independent frequency bands, with adjustable crossover points and envelope controls for each band. Each frequency range has both an upper and lower threshold, allowing for compression or expansion per band.
For the purpose of this tutorial, we will explain how to use the Multiband Dynamics audio effect in Ableton Live 10:
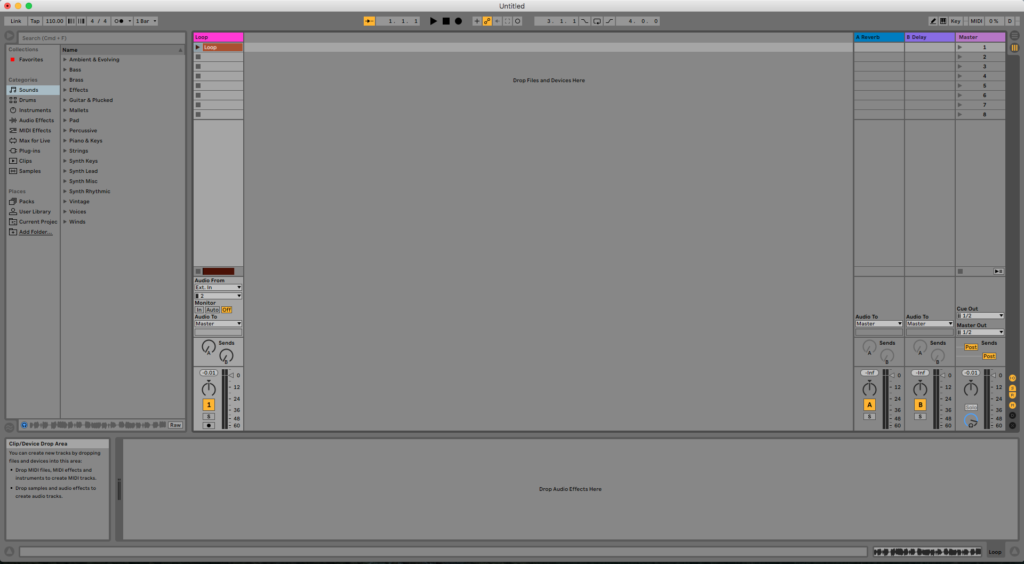
- Create a Live Set with at least one audio track. Make sure the audio track has at least one audio clip assigned to it.
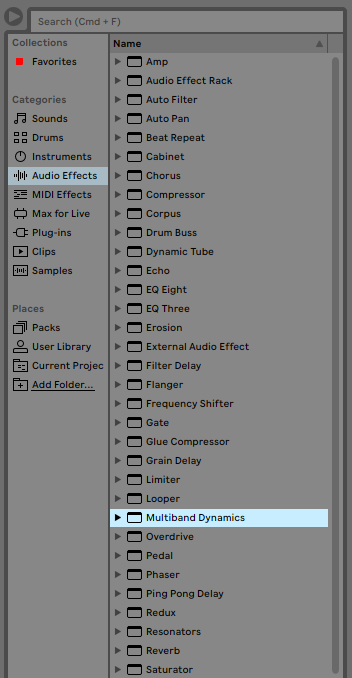
2. From the Browser, search for Audio Effects -> Multiband Dynamics:
3. Drag and Drop the Multiband Dynamics audio effect on top of the audio track labeled as “Loop”.
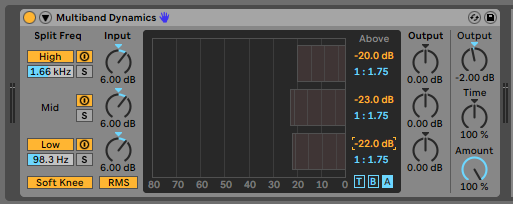
As soon as this effect has been dropped on top of the track, it is easy to see how the Multiband Dynamics audio effect now appears on the device view of the track.
It is easy to see from the previous picture, the Multiband Dynamics audio effect has several parameters that can be explained as:
- High and Low band ON/OFF: These switched turn ON/OFF the high and low bands. When both are OFF, only the MID band is on, acting as a single band dynamics processor.
- Mid-High Crossover: This knob sets the bottom of the frequency range for the high band.
- Low-Mid Crossover: This knob sets the top of the frequency range for the low band.
- High/Mid/Low band activators: These buttons toggle the gain control and dynamics processing of each band ON or OFF.
- Solo buttons: These buttons solo each of the bands.
- Input gain: These three knobs can control the input gain for each of the bands.
- Soft Knee: When this switch is ON, compression and expansion will happen gradually as the threshold is approached.
- Peak/RMS: This button toggles between the two envelope follower modes. When RMS is selected, the processor is less sensitive to short peaks and allows the processing to only happen when the level crosses the threshold for a longer time. When PEAK is selected, the device automatically reacts to shorts peaks of the incoming signal.
- Output gain per band: These three knobs control the output gain of each band after the dynamics processing has been applied.
- “T” button: When selected, the time controls are displayed and the user can set attack and release for each band.
- “B” button: When selected, the below threshold and ratios are displayed and the user can set them for each band.
- “A” button: When selected, the above threshold and ratios are displayed and the user can set them for each band.
- Master Output: This knob controls the overall output gain of the processor.
- Time: This knob scales the durations of all attack and release controls, maintaining the same relative envelope times.
- Amount: This knob adjusts the intensity of the processing applied to all bands.
For the purpose of this tutorial, we will use the Multiband Dynamics to create an overall multiband compression effect, ideal for pre-mastering purposes. The Multiband Dynamics audio effect should be set as:
Low Band:
- High and Low band ON/OFF: Both ON.
- Mid-High Crossover: 1.6 KHz.
- Low-Mid Crossover: 98 Hz.
- High/Mid/Low band activators: All ON.
- Solo buttons: All OFF.
- Input gain: All set at +6 dB.
- Soft Knee: ON.
- Peak/RMS: RMS.
- Output gain per band: All set to 0 dB.
- “T” button:
- Attack of High Band: 80 ms
- Release of High Band: 200 ms.
- Attack of Mid Band: 100 ms.
- Release of Mid Band: 280 ms.
- Attack of Low Band: 150 ms
- Release of Low Band: 350 ms
- “B” button:
- Below threshold of High band: -80 dB
- Ratio of High band: 1:1.00
- Below threshold of Mid band: -80 dB
- Ratio of Mid band: 1:1.00
- Below threshold of Mid band: -80 dB
- Ratio of Mid band: 1:1.00
- “A” button:
- Above threshold of High band: -20 dB
- Above of High band: 1:1.75
- Above threshold of Mid band: -23 dB
- Above of Mid band: 1:1.75
- Above threshold of Low band: -22 dB
- Above of Low band: 1:1.75
- Master Output: -2 dB.
- Time: 100%.
- Amount: 100%.
4. Apply the previous configuration, and the Multiband Dynamics audio effect should look like this:
At this point we have successfully explained how to use and configure the Multiband Dynamics audio effect in Ableton Live 10. The tutorial has now finished.
Using Ableton Live 10 software to produce music would be ideal with one of our professionally designed PCAudioLabs Systems due our high-performance specifications in order to work with any of the Digital Audio Workstations supported. If you would like to order one of our PCAudioLabs computers, please call us at 615-933-6775 or click this link for our website.


