The following tutorial shows the user a basic overview of the Record and Monitor Buttons in Studio One 4.
Need a Pro audio PC to run PreSonus Studio One 4 software and all of its features at its best? Check out all the pro audio PC offerings from PCAudioLabs
Modern Digital Audio Workstation software give the users the possibility of recording tracks while listening to the recorded material through the software or through the interface. This is possible because of software’s ability to enable or disable the recording/monitoring option of each track. In the case of Studio One 4, two buttons are presented for this purpose on each track, giving the user the chance to select which track to record, which track to only listen to its input through the software, and which track to record while also listen to its input through the software.
This tutorial will present a basic overview of the Record and Monitor Buttons in Studio One 4.
PART I: RECORD AND MONITOR BUTTONS:
Record and Monitor buttons are located on the timeline as well as the Mix window as:
The RECORD button can be found as a small circle:
The MONITOR button can be found as a small speaker:
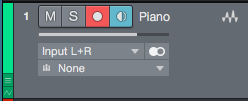
By default, Studio One 4 will turn both buttons ON when the record button is pressed as:
When this is the case, the track is considered as “Record enabled” which means, once the record button from the transport bar is pressed, the recording of the digital audio will begin on the track. Since the MONITOR button is also set to the ON position (blue light), the user will also listen to the recorded material that is coming out of the software (including all the possible processing, plugins and effects applied to it, as well as the possible latency that could occur).
PART II: MONITOR BUTTON ONLY
The MONITOR button can be pressed individually in order to only monitor the signal coming through the track, for “practice” or “rehearsal” purposes as well as line checks.
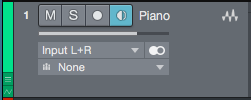
When the MONITOR button is the only option pressed, it will look as:
At this point the user can simply play the instrument and listen to its signal while the playback is either running or not. No recording will happen.
PART III: RECORD BUTTON ONLY
The RECORD button can be pressed individually in order to only record the signal but not listen to it through the software. If the user wants to be able to listen to the signal, this monitoring will have to be done using the proprietary software that is included with the interface or sound card that might let the user listen to the input of the preamp directly, before passing through the software.
When the RECORD button is the only one selected, it will look as:
At this point we have explained all the different combinations the user can toggle between the RECORD and MONITOR button in Studio One 4. The tutorial has now ended.
Using Presonus Studio One 4 software to produce music would be ideal with one of our professionally designed PCAudioLabs Systems due our high-performance specifications in order to work with any of the Digital Audio Workstations supported. If you would like to order one of our PCAudioLabs computers, please call us at 615-933-6775 or click this link for our website.


